The customer service team is always listening, taking notes, and quantifying complaints to ensure our products are continually improved. Due to selling directly to you, the customer, via Amazon, we can use product reviews to help us improve our existing products or help further development of new products.
Table of Contents
As summer starts to heat up, a lot of us are looking for fun, simple meals that are quick and easy to make. A rotisserie chicken may not be the quickest meal, but it’s relatively easy, and can leave you with plenty of leftovers to use in the days to come.
Learning how to use a rotisserie burner on a gas grill or just using a specially-made rotisserie grill to cook your chicken is an important step in enjoying this summertime classic. Once your meat is ready to come off of the heat, it’s also important that you know how to check rotisserie chicken temperature.
As long as you’ve studied up before you start hitting the grill, however, you’ll be able to crank out high-quality, restaurant-style rotisserie chickens in no time at all!
What Is a Rotisserie Chicken?
Rotisserie refers to a method of cooking in which some sort of food, usually a meat, is placed on a spit and slowly rotated in front of a heat source. The rotation of the spit allows the meat to cook evenly and consistently at a relatively high temperature, which makes for a better finished dish.
During medieval times, rotisserie chickens were made by manually rotating the spit over a fire. Servants had to sit near the fire and constantly turn the spit to ensure an even cook time. Today, however, the rotation is usually mechanical, and the heat source is usually powered by gas or electricity.
Today, most rotisserie chickens are mass-produced by grocery stores. The rotisserie chickens tend to be less expensive than other types of meat, due to their ease of production and the fact that older chickens can be used to make a perfectly good rotisserie meal.
Costco Wholesale, in particular, is one of the largest producers of rotisserie chicken in the world. In one year, the warehouse giant sold over 87 million dollars’ worth of rotisserie chickens, and currently has no plans to increase its price beyond the 5-ish dollars it’s been charging for more than ten years.
Your local supermarket may be the easiest place to find a rotisserie chicken, but nothing beats a handmade chicken that you’ve cooked to perfection by yourself!
Easy Steps for Making a Rotisserie Chicken
Just because supermarkets have the lock on the rotisserie chicken business doesn’t mean that it’s inaccessible at home. To get that perfect rotisserie chicken, just follow these ten simple steps:
- Gather Your Tools. Make sure you have the tools you need before you start cooking. This includes a meat thermometer, rotisserie kit, and probably heatproof gloves!
- Prepare Your Chicken. Before cooking, remove any skin and bind the legs with twine. You can brine your chicken beforehand, but it’s not required.
- Assemble Your Grill. Most rotisserie kits come with instructions, but you generally want to make sure that the rod is high enough to let the chicken rotate completely.
- Prepare the Rod. Because most rotisserie spits tend to be a lot smaller than the chicken’s cavity, you may want to impale a lemon or some other similarly-sized fruit or veggie on the spit to help hold it in place.
- Attach the Chicken. You may need to use a little more twine, but just make sure that the chicken doesn’t move when the spit turns.
- Attach the Counterbalance. The counterbalance is a small weight that lets the chicken turn slowly and evenly without straining the rotisserie motor.
- Find a Good Heat. As you start up your grill, keep the temperature relatively low (no higher than 350 degrees Fahrenheit). Make sure the heat is evenly dispersed along with your chicken.
- Season Your Bird. As the chicken begins to turn, you can start basting your bird with whatever seasonings you prefer! Some of the more common flavors are lemon, rosemary, sage, and paprika, but this is where you get to throw your own stylistic flair on it!
- Take the Temperature. Using a meat thermometer like these ones, take your chicken’s temperature once the skin’s turned golden brown and “bubbly”.
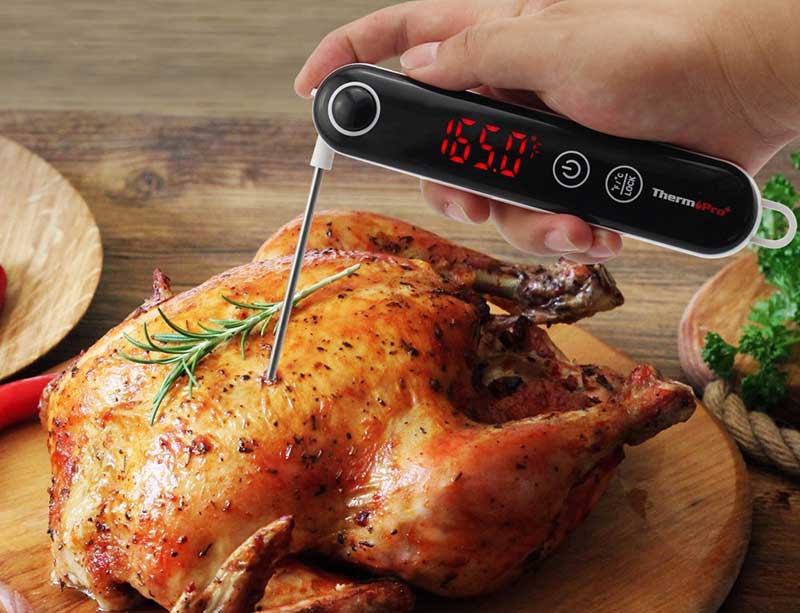
- Insert the thermometer. Insert the digital meat thermometer into the thickest part of the chicken and check to see if the internal temperature has reached 165 degrees Fahrenheit.
Enjoy! A good chicken can take anywhere between thirty minutes and an hour to cook, depending on the size of the bird. Once the safe temperature has been reached, remove your chicken from the spit, let it rest for about ten minutes, and then dig in!
How to Evaluate Your Rotisserie Chicken
Before your chicken is on the spit, and after it’s finished cooking, there are a few factors to keep in mind that split the difference between an amazing rotisserie chicken and one that’s just okay, including:
The health of the Chicken: As a general rule, a great chicken is one that comes from an organic, free-range farm and has been air-chilled to reduce the risk of bacteria.

An “okay” chicken will not feature the USDA organic stamp or any other indications of quality of life.
- Size: This may be more dependent on personal taste, but a great chicken will usually weigh between two and four and a half pounds. An “okay” chicken—five pound or larger—will not cook as evenly and may still be raw in parts.
- Doneness: We’ll go into more detail below, but a truly awesome rotisserie chicken needs to be cooked to perfection in order to get that crisp skin we all love. An “okay” chicken, by contrast, may be unevenly or even not fully cooked.
- Seasoning: A great chicken is one that has all the tastes you and your loved ones crave, while an okay chicken uses run-of-the-mill seasoning for a passable but bland end result.
Ideal Cooking Times and Temperature for a Juicy Rotisserie Chicken
The recommended temperature for a rotisserie chicken is 165 degrees Fahrenheit (about 70 degrees Celsius). Not only does this preserve the juiciness and flavor of a roast chicken, but it also kills off any potentially dangerous bacteria like salmonella.
For this reason, a good meat thermometer is an absolute must when it comes to getting that perfect roast bird. Test your chicken frequently throughout the cooking process to ensure that it’s cooking to the right temperature.
As a general rule, a rotisserie chicken should take no less than thirty minutes to cook fully. The exact time may vary based on the size of the bird and the heat of your grill, but anything between half an hour and an hour should give you the results you want.
Again, temperature is the main factor to consider. If your chicken has been on the grill for a while but still has not reached 165 degrees, it needs to keep cooking.
How to Check the “Doneness” of Your Rotisserie Chicken?
Fortunately, the process of checking the chicken’s temperature is fairly straightforward:

- Get a “Fast” Thermometer. A good digital thermometer will be able to give you an accurate and immediate reading as you move through the different layers of the chicken.
- Go Slowly. Moving slowly and steadily, push the thermometer’s probe into the thickest part of the chicken. Then remove the thermometer just as slowly, watching the reading the whole time.
- Take the Lowest Number. Chicken cooks from the outside in, so the lowest temperature (usually the temperature at the middle of the chicken) is the most accurate reflection of how “done” your rotisserie chicken is.
- Repeat As Necessary. Take the temperature multiple times! Again, your chicken may take a little bit longer, but it’s worth it to make sure that your chicken is totally safe for you and your loved ones to enjoy.
- At the end of the day, what makes or breaks any meal is the tools you use to prepare it. A good meat thermometer from a trusted manufacturer like Thermopro can go a long way towards making sure that you’re ready to handle any meal that you set out to cook.
- The other key element is patience. It’s very rare that good things happen instantaneously, and taking the time to make sure that your chicken is cooked to perfection can help you get the end results that you crave.
We strongly recommend green-hands to use any of the following ThermoPro digital meat thermometers to check rotisserie chicken doness.
Finally, don’t worry if your first try isn’t perfect! Keep working on your recipe, be patient with your own progress, and enjoy the delicious rotisserie chicken that you get to taste test in the meantime!


