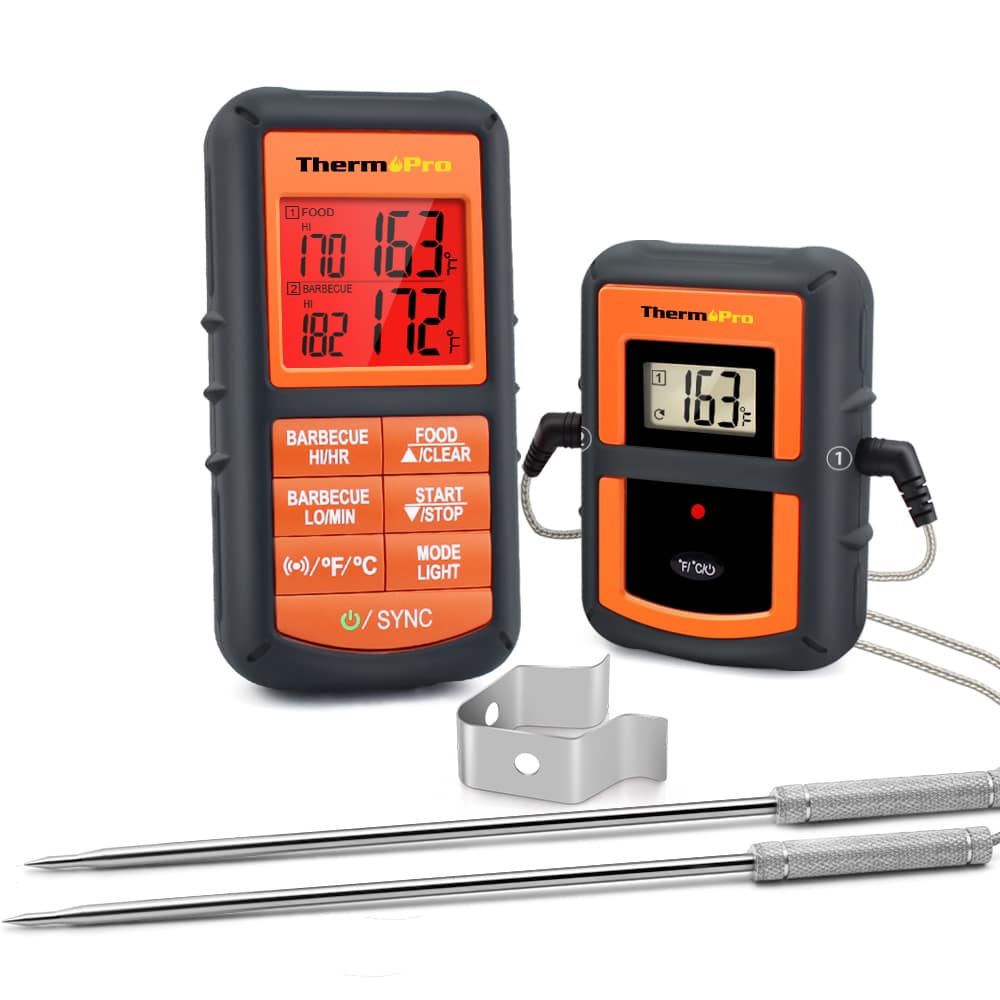
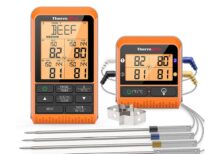
Wireless Remote Digital Cooking Food Meat Thermometer for Grilling with Dual Probe
【Hands free monitor】Wireless digital meat thermometer with dual probe monitors food or oven/grill/smoker temps up to 300 feet away, enabling you to enjoy your company without continuously excusing yourself;
【Hassle-free setup】No sync required, say goodbye to the tedious setup steps; Large LCD displays both food and oven temps and timer for the most intuitive experience; Back-lit for use in low light condition;
【USDA preset temperature settings】BBQ thermometer with preset temperatures for 9 types of meat and their various doneness levels recommended by USDA; All of the preset temps can be reset to your desired tastes;
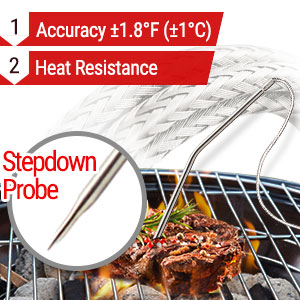
【Durable & Accurate probes】Grilling thermometer features food grade stainless steel probe with step-down tip design to get temperature more precisely and quickly; Probe wires can withstand up to 716°F;
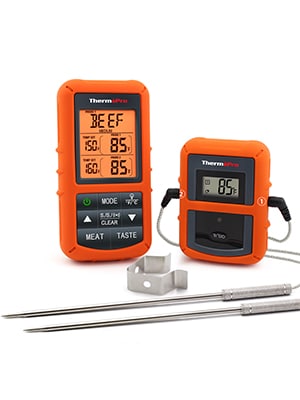
A good thermometer helps you eliminate all the guesswork and cook food perfectly every time. ThermoPro TP20 is equipped with dual-probe technology, enable you to monitor two kinds of meat or use one sensor as an oven probe that will accurately read its surrounding temperature. With a receiver range of up to 300 feet away that will keep you updated on the temperature of your meal, feel free to mingle, do chores or watch TV without ever having to physically check on your food!
Supporter of the Guy Fieri Foundation
ThermoPro is proud to partner with the Guy Fieri Foundation, a non-profit organization whose programs support communities affected by natural disasters, celebrate our first responders, military and veterans and provide scholarships for aspiring culinary students.
Package:
1 x Receiver
1 x Transmitter
2 x Probes
1 x Clip
4 x 3A batteries
1 x Manual
Remote Range: Up to 300 feet
Temperature Accuracy: ±1.8°F (±1°C)
Temperature Range: 32°F to 572°F (0°C to 300°C)
Fahrenheit and Celsius readings
Countdown & Count Up Timer
Uses: BBQ, Oven, Smoker, Grill, Meat, Food
Power: 4*3A batteries (included)
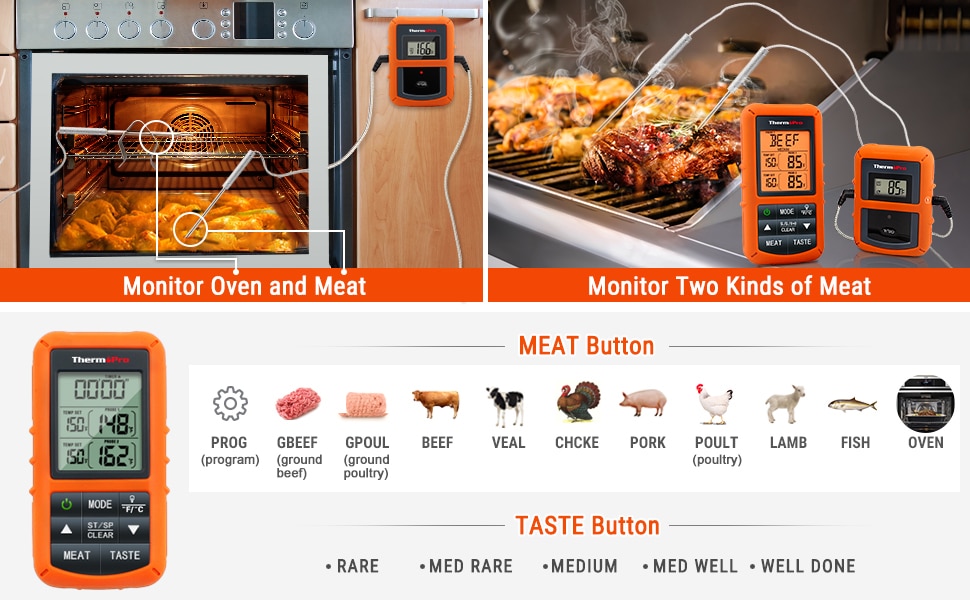
Dual Probe Monitors Two Different Food or One Meat and Grill/ Oven/ Smoker’s Temperature
Features:
Dual probe technology, monitor two different meats or one meat and the grill/oven/smoker temp
No Synch Required! Simple interface and setup, ready to use right of the box
Programmed with preset USDA approved temperatures for different types of meat (Ground Beef, Ground Poultry, Beef, Veal, Chicken, Pork, Poultry, Lamb and Fish)
Programmed with preset USDA approved doneness levels for a different types of meat (Rare, Medium Rare, Medium, Medium Well and Well Done)
Fahrenheit and Celsius readings
Timer and temperature settings are saved when unit is powered off
Splash proof receiver; Receiver pullout counter top stand; Receiver belt clip; Rubber sleeve case
Transmitter has wire to either hook on oven door or use as a stand
Large backlit LCD makes nighttime grilling easy
Enjoy your cooking with ThermoPro TP20 digital meat thermometer!
High Accuracy & Heat Resistance
Molded-in button and fully sealed design make it possible to rinsed off under the running water without damage, easy to clean after use.
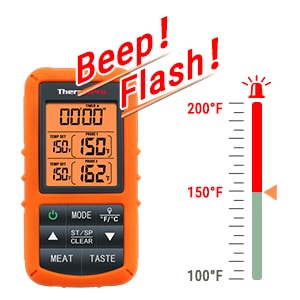
Alarm for Programmed Temp
Receiver will flash and beep when food temperature reaches your programmed temperature, no more overcooking.
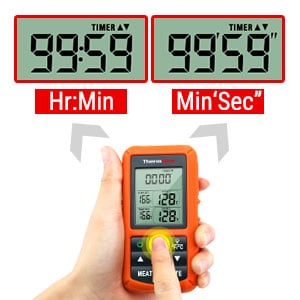
Countdown & Count Up Timer
Countdown and count up timer with two time duration options (99min 59sec, 99hr 59min), manage your time effectively.
Add Your Heading Text Here
Lorem ipsum dolor sit amet, consectetur adipiscing elit. Ut elit tellus, luctus nec ullamcorper mattis, pulvinar dapibus leo.
Add Your Heading Text Here
Lorem Ipsum
Lorem Ipsum
Lorem Ipsum
Lorem Ipsum
Lorem Ipsum
Add Your Heading Text Here
Add Your Heading Text Here
Weight
1 g
Backlight display
Yes
Bluetooth
No
Calibration feature
No
High low temperature alarms
Both
Mobile app
No
Preset temperature options
Yes
Probe quantity
2
Range
300ft
Taste settings
Yes
Timer
Yes
Waterproof
Not Waterproof
Remote
Yes
TP-20Specification
Temperature Range
14˚F to 572˚F (-10˚C to 300˚C)
Tolerance
±1.8˚F (±1.0˚C) from 14 to 212°F (-10 to 100°C),otherwise ±2%
Sensor Type
NTC
Wire Probe
Total length: 49 inches (1250mm) Probe length: 8 inches (205mm)
Refresh rate
4 seconds
Transmission Range*
500ft(150M)
Wireless Technology
ASK 915Mhz for USA/Canada and 868Mhz for Europe
Display
Receiver
LCD, 1 1⁄2 Length x 1 13⁄16 Width inches(39.0L x 46.0W mm)
Transmitter
LCD, 1 Length x 1 3⁄16 Width inches(25.0L x 29.5W mm)
Backlight
Y
Unit Size
Receiver
2 11⁄16 Length x Width x 1 1⁄8 Height inches (68.0L x 125.5W x 28.0H mm)
Transmitter
2 11⁄16 Length x 3 5⁄8 Width x 1 1⁄2 Height inches (68.0L x 92.0W x 39.0H mm)
Power
Receiver
3.0V (2xAAA Batteries)
Transmitter
3.0V (2xAAA Batteries)
*The stated transmission range is based on tests at an ambient temperature of 77°F or 25°C without any obstructions or electromagnetic interference. Your range can vary depending on the number of obstructions and electromagnetic in your environment.
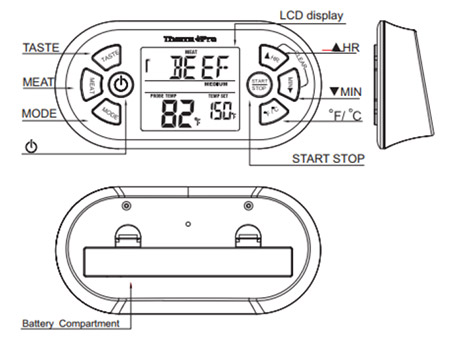
Receiver Features
LCD (Liquid Crystal Display) – Displays all icons, temperature and time.
Dual probe temperature display.
Programmable alert with preset temperatures for specific foods.
99-hour, 59-minute countdown timer and count up timer
Temperature range of probe: 32˚F to 572˚F (0˚C to 300˚C).
Temperature tolerance of internal food reading: /-1.8˚F ( /-1.0˚C).
Battery compartment – Holds 2 AAA batteries.
Belt clip/Stand – Belt clip allows you to be mobile. Clip the receiver unit to belt. Swings out and allow you to stand the receiver on tabletop as well.
Buttons
MODE – Press to select Thermometer Probe 1, Thermometer Probe 2 or Timer mode. Press and hold for 2 seconds to enter Synchronization/Pairing mode.
▲– In thermometer mode (Probe 1 or 2), press once to increase the temperature value. Press and hold for 2 seconds and the temperature value will increase at a faster pace. In timer mode, press once to increase Hour, Minute or Second setting. Press and hold for 2 seconds, the hours, minutes or seconds will increase at a faster pace.
▼– In thermometer mode (Probe 1 or 2), press once to decrease the temperature value. Press and hold for 2 seconds, the temperature value will decrease at a faster pace. In timer mode, press once to decrease Hour, Minute or Second setting. Press and hold for 2 seconds, the hours, minutes or seconds will decrease at faster pace.
S./S.//CLEAR – When setting the timer, press to confirm the setting. When the timer setting is set, press once to start the timer. When the timer is running, press once to pause the timer. Press and hold for two seconds to clear timer setting. Press it to turn ON/OFF the alarm in BBQ mode.
MEAT – In thermometer mode, press to select the meat type: PROG (program – User Self-Defined), GBEEF (Ground Beef), GPOUL (Ground Poultry), BEEF, VEAL, CHCKE (Chicken), PORK, POULT (Poultry), LAMB, FISH, HAM and BBQ. In Timer mode, press to select Hour, Minute mode or Minute’ second” mode.
TASTE – In thermometer mode, press to select the meat taste level: RARE, MED RARE, MEDIUM, MEDIUM WELL and WELL DONE. In BBQ mode, press it to display HI or LO BBQ temperature.
/ºF/ºC–Press once to turn on or off the backlight, Press and hold for 2 seconds to select temperature readings in Celsius or Fahrenheit.
– Press once to turn ON/OFF the receiver.
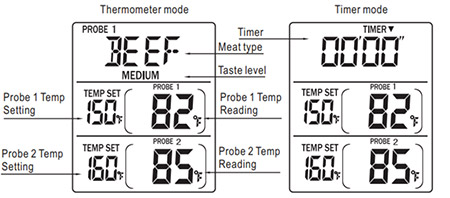
LCD Screen
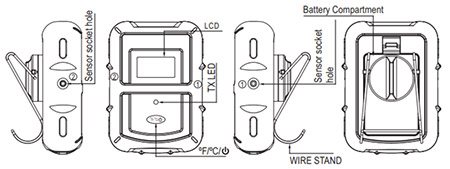
Transmitter Features
LCD (Liquid Crystal Display) – displays temperatures of both probe 1 and probe 2. It will automatically switch between probe 1 and probe 2 displays.
Wire Stand – Allows you to stand the transmitter on tabletop or it can be reversed and used as a hanger.
Battery Compartment – holds 2 AAA batteries.
Sensor socket hole – Plug-in for stainless steel probe 1 and probe 2.
Button
ºF/ºC/ – Press once to turn on or off the transmitter. Press and hold for 2 seconds to select the transmitter temperature display in ºC or ºF.
Installing batteries
Open the battery compartment of the receiver and insert two “AAA” batteries with correct polarity. Open the battery compartment of the transmitter and insert two “AAA” batteries with correct polarity.
Turn On/Off Unit
– Press button on the receiver to turn on/off the receiver; – Press ºF/ºC/ button on the transmitter to turn on/off the transmitter.
Synchronize/Pair Transmitter and Receiver
The transmitter and receiver were already paired at our manufacturing facility. Usually you do NOT need to re-synchronize or repair the units. You just plug in the probes, insert batteries, turn on the receiver and the transmitter and wait for a few seconds, you will see the temperatures shown on both receiver and transmitter and the units are ready for use. However, in some unusual cases, the transmitter and receiver are no longer paired, then you may need to re-synchronize them by following the below steps:
Insert the stainless steel probes into the corresponding plugs in the transmitter.
Turn on the transmitter by pressing the ºF/ºC/ The transmitter will show the current temperatures on its LCD display.
Turn on the receiver by pressing the button.
Press and hold Mode button on receiver for 2~3 seconds to enter the synchronization mode which will last for 60 seconds. The display shows “—” and it is flashing.
Wait for a moment until the temperature reading shows on the receiver display, it means the synchronization/Pairing is complete. Your professional remote cooking thermometer is now ready for use.
Note: The synchronization between the transmitter and the receiver won’t be lost even if you replace the batteries.
Loss link alert
If the receiver is taken out of range or there is abnormal external interference or after shutting off the transmitter, the receiver may not be able to receive the transmission from the transmitter. If this happens for over 4 minutes, the unit will alert you the signal is lost. Pressing any button on Receiver will stop the Loss Link beep. To regain transmission signal, move the receiver closer to the transmitter, the link should be automatically restored and the temperatures should appear on the receiver display.
Auto Off Feature
The receiver will turn off automatically if it hasn’t received the temperature signal from the transmitter for more than 30 minutes, a beep will sound for one minute before it shuts down. However, the Auto Off feature will be automatically disabled if the timer is running.
Measure meat temperature set to your specific taste
Press MODE to select Thermometer Mode, Probe 1 or Probe 2.
Press ▲ or ▼ to raise or lower the set temperature. As you press ▲ or ▼ the display changes to PROG (program). Press and holding the button will raise or lower the temperature setting rapidly. Pressing MEAT will return you to the preset USDA ranges.
Once the temperature of meat reaches the preset doneness level, the receiver will beep and the LCD backlight will be turned on. Press any button to stop the beep.
How to Monitor BBQ/Oven Temperature
You can use probe 2 to measure and monitor the temperature inside the BBQ, smoker or barbeque. Clip the probe to grill rack of BBQ, or oven rack.
Press MODE to select Probe 2.
Press MEAT repeatedly until the display shows BBQ.
Press ▲ or ▼ to set your desired temperature of the HI BBQ setting. Press and hold the ▲ or ▼ button to make the adjustment faster. The HI BBQ temperature range is 140 ºF – 572 ºF and the default setting is 250 ºF.
Press the TASTE button to switch to the LO BBQ setting. Press ▲ or ▼ to set your desired temperature of LO BBQ setting. Press and hold the ▲ or ▼ button to make the adjustment faster. The LO BBQ temperature range is 32 ºF – 554ºF and the default setting is 225 ºF.
Press the S./S./ /CLEAR button to turn on/off the alarm function.
Press the TASTE button to display the High or Low temperature setting. (Note: the HI BBQ setting will not allow you to set the temperature below the LO BBQ setting. LO BBQ temperature is always lower than the HI BBQ temperature by 2ºF)
Note: The LO BBQ temperature alarm will not be activated until the actual BBQ temperature goes above the set LO temperature.
Using the Timer
Count down
Press the MODE button to select the TIMER mode. The timer 00:00 with a small icon TIMER will be shown in the upper part of the display.
Press MEAT to switch between Hour: Minute timer to a minute’ second” timer and back.
Press ▲ or ▼ to adjust timer setting. Press and hold ▲ or ▼ to adjust setting at a faster pace. Press S./S./ /CLEAR to confirm the setting. The maximum countdown timer setting is 99 hours and 59 minutes.
Press and hold S./S.//CLEAR to clear the setting back to 00:00
After setting, press S./S.//CLEAR to start the timer. TIMER ▼ will blink indicating the countdown timer is running.
To pause the countdown process, press the S./S.//CLEAR button. The TIMER becomes solid. Press the S./S.//CLEAR button to continue the timer.
When countdown timer reaches 00:00, an alarm will sound and backlight will be on for one minute.
Note: When the timer counts down below 1 hour 1:00, the display will automatically change to 59’59” to indicate, 59 minutes 59 seconds. The seconds will be shown counting down then. When the countdown reaches 0’00” the timer starts counting up and it will beep for 60 seconds. Press any button to stop the timer. Count up
Press the MODE button to select the TIMER mode, The timer 00:00 with a small icon TIMER will be shown in the upper part of the display. If the timer setting is not 00:00, press and hold S./S.//CLEAR to clear the setting to 00:00.
Press the S./S.//CLEAR button to start count up. The TIMER ▲ will blink indicating count up timer is running. The maximum count up that can be reached is 99 hours and 59 minutes.
To stop the count up process, press the S./S.//CLEAR button. The ▲TIMER ▲ becomes solid.
Press and hold S./S.//CLEAR to clear the setting back to 00:00.
When count up timer reaches 59 minutes and 59 seconds, it will automatically change to Hour: Minute display format.
Cleaning
Always wear a heat resistant glove to touch the stainless steel probe sensors or wires during or just after cooking. Do not touch with bare hands.
Keep the stainless steel probe sensors and wires away from children.
Wash the metal probe tips with hot soapy water and dry thoroughly. Do not immerse the probe in water while cleaning.
Wipe the transmitter and receiver with damp cloth. Do not immerse either in water.
Question: Does it come with a storage case? Answer: No, it doesn’t.
Question: Hi, what is the difference between TP-20 and TP-22 please? Answer: Just a design difference.
Question: Can you use other probes with the TP-20 or do you have to use the probes that it comes with? Answer: Sure, as long as they fit our connectors.
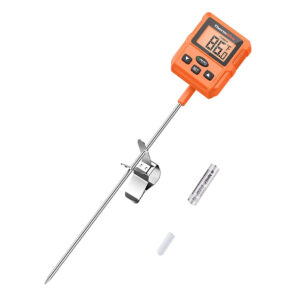
Question: can the thermopro be used as an instant read thermometer? Answer: Hello,Yes it can, it reads in about 5-7 seconds.
We truly pride ourselves on a hassle-free, friendly customer support experience with a team that’s available 5 days a week from 8:00 am to 6:00 pm EST. Rest assured if you contact us by email, phone, or online chat, you’ll be speaking to a native speaker in your spoken language.
The customer service team is always listening, taking notes, and quantifying complaints to ensure our products are continually improved. Due to selling directly to you, the customer, via Amazon, we can use product reviews to help us improve our existing products or help further development of new products.
INDUSTRY LEADING WARRANTY
Our warranty coverage for our products is the backbone of our company and we’re capable of offering such a robust warranty is that we believe in our product quality due to our feedback based design philosophy and if anything does happen, we’ll stand behind our products. This also enables our customer support to team deliver continuously great experiences.


")